Funswizard

Funswizard

Provider:Funsterbe
Type:program
Version:2.1
Views:6901
Help other people decide, vote up or down?
1
2
Funswizard fanart

Simple Wizard is a lightweight template for installing builds on Kodi. Has some code from Aftermath Wizard by Surfacingx. Skin Switch by OpenELEQ. Base code by BYB. Credits to them and all others who contributed. Please report any bugs to @slamious on Telegram/Twitter.

Disclaimer

This Addon contains no content

Description

Kodi Wizard

News

3.0.2 - Added speedtest. Bugfixes. 3.0.0 - Added backup/restore functionality for trakt/debrid accounts. Updated debrid/trakt authorization section. Restore of gui/skin settings has been added. Updated Advancedsettings configs. Updated wizard artwork. Added user edited color options for menus. Fixed wizard writing over itself during build installs. Edited fresh start to keep wizard/dependencies. Removed double ok dialog during build installs. Numerous other small fixes throughout.

View More

How To Install

Direct installation

Via Repository

Via Directory

  1. Download the addon.
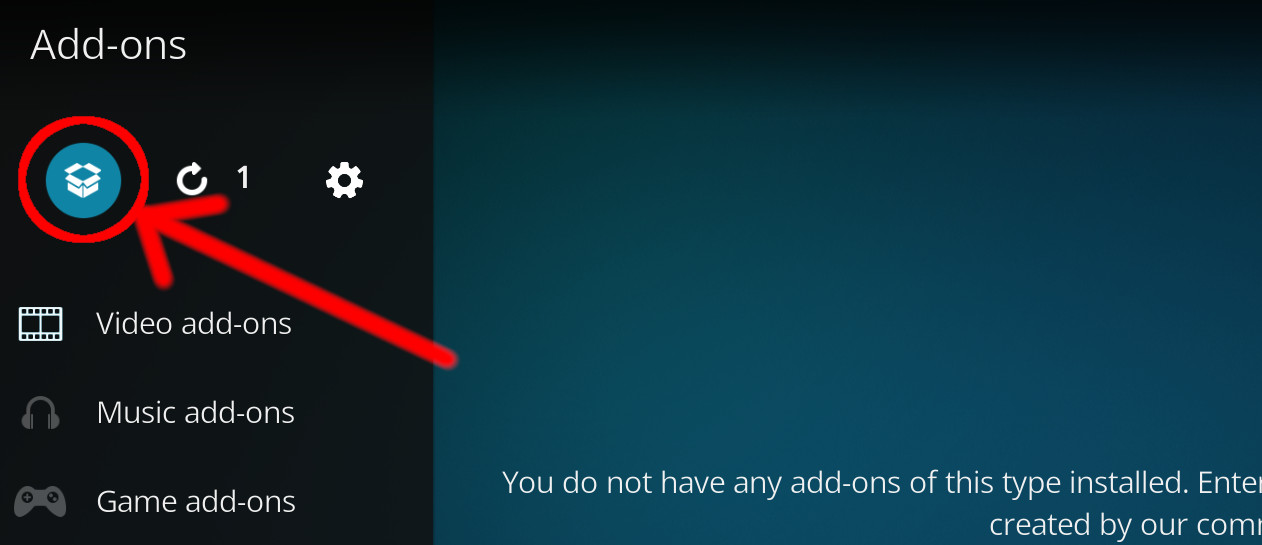
  2. Open up Kodi and navigate into Add-ons.
    addon install - Add-ons
  3. Click the open box icon (above the side-menu).
    addon install - openbox
  4. Select Install from zip file.
    • If this is the first addon you install, Kodi will warn you about installing addons from "unknown sources" for security reasons - it's your call.
    • In any case, Kodi will warn you, you may not get auto-updates for this addon.
  5. Navigate into the location where you've downloaded the addon to and select it to Install.
Installing via directory means you connect to a Web server directly using Kodi.
It also means that the addon is found under a repositry or a sub-repository you install from that directory (check out which repositories host Funswizard addon below).
  1. Open up Kodi and navigate into the System settings screen by selecting the cogwheel button (above the side-menu inside Kodi's home-screen).
  2. Select File manager.
    addon install - Kodi file manager
  3. Select Add source from the left pane (the right pane is in case you want to move files from one folder to another, if you're using a mouse you may need to double click it).
  4. Click the line where it says <None> and enter the following url:
    https://mrgsi.github.io/gsource/
    Note: some servers may be case-sensitive.
    addon install - Add new source
    click OK after you are done typing.
  5. Below that, if there isn't already, enter a name for the source which will be easy for you to recognize in the future. Click OK
  6. Now press the return button twice to return to home-screen.
    Navigate into Add-ons.
    addon install - Add-ons
  7. Click the open box icon (above the side-menu).
    addon install - openbox
  8. Select Install from zip file.
    • If this is the first addon you install, Kodi will warn you about installing addons from "unknown sources" for security reasons - it's your call.
    • In any case, Kodi will warn you, you may not get auto-updates for this addon.
  9. Look for the name of the source as it was entered in step 5, select the repository zip file you see inside it.
    That's it. The rest of the instructions are as detailed in installing Via Repository, use the repository you've just installed.

For a full installation guide please click here.

Additional Information

Updated:January 18, 2024

In Repositories:

Platform:all

Alternative Sources:

Download 1
License:GPL-2.0-or-later

Depends On:

Recommended Addons

Indigo

Indigo

tvaddons4432 views
COMMENTS