There are basically 3 ways to install a Kodi addon:
- Installing directly from zip – apply to all cases.
- Installing from a repository – apply to all cases except rare occasions.
- Adding source – apply to some cases only.
Each of these methods has its own pros and cons, below you’ll find detailed instructions, plus:
Install Directly from ZIP file
To install an addon directly from zip file
- Download the addon.
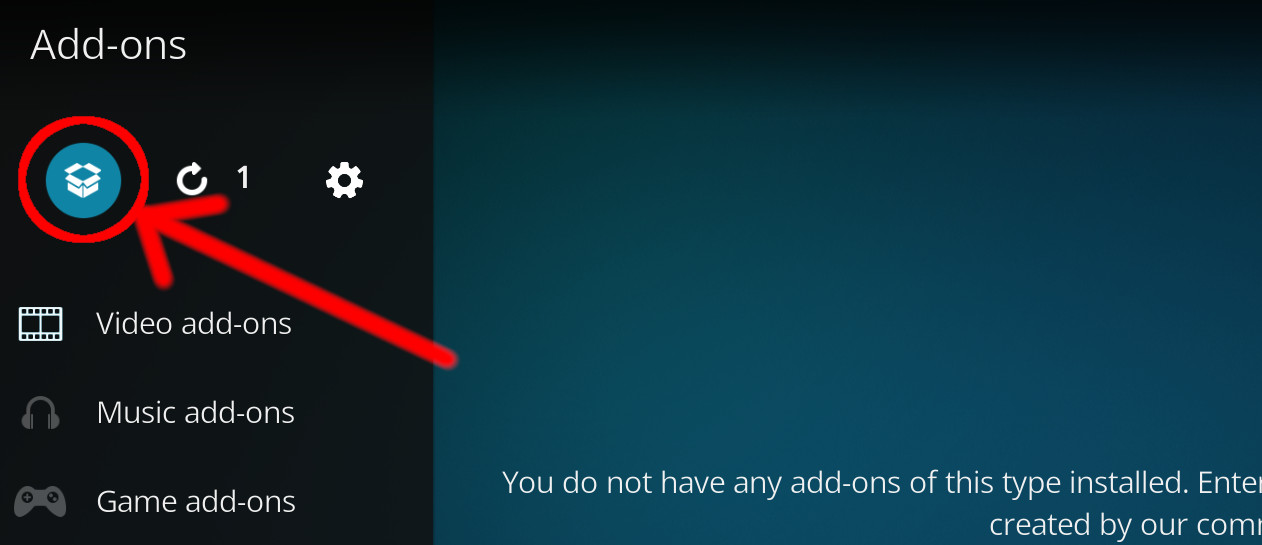
- Open up Kodi and navigate into Add-ons.

- Click the open box icon (above the side-menu).
- Select Install from zip file.
- If this is the first addon you install, Kodi will warn you about installing addons from “unknown sources” for security reasons – it’s your call.
- In any case, Kodi will warn you, you may not get auto-updates.
- Navigate into the location where you’ve downloaded the addon to and select it to Install.
The advantage of this method is it’s quick, direct and lightweight.
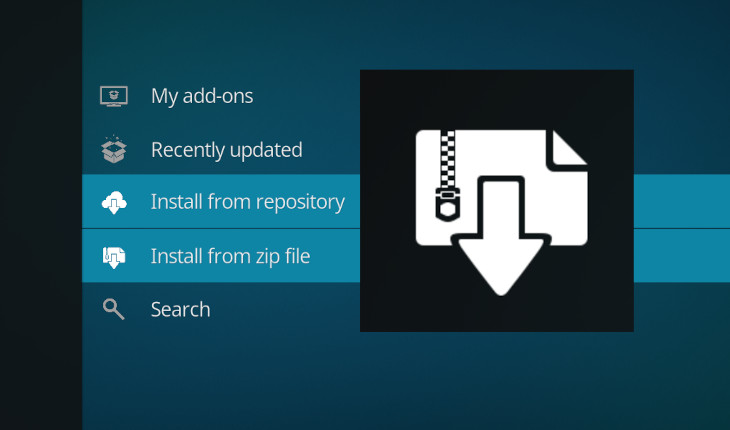
Install from a Repository
To install an addon from a repository (first make sure you have the repository installed)
- Open up Kodi and navigate into Add-ons.
- Click the open box icon (above the side-menu).
- Select Install from repository.
- If you have at least one repository (besides the default) installed:
Select the repository you wish to install from. - Select the category the addon belongs to, in this case it should be video.
- Select the addon.
- Click Install.
The advantage of this method is it syncs the addon you installed with the one found in the repository, if the maintainer updates the addon – you’ll get the update automatically (unless you’ve disabled that feature).
Install by Adding a Source
To install an addon by adding a source, you’ll need to know the address of the source. This method is very specific and as mentioned only apply to some cases. Basically, you do it so
- Open up Kodi and click the cog (above the side-menu).
- Select File manager.

- Select Add source (you may need to double click it).
- Click the line that says <None> (a keyboard will appear) and enter the address of source.
- Enter a name for that source below it and click OK.
- The new source will now appear in the file manager, enter it, select Install from zip file.
- Navigate into the new source you’ve just added and from there into the addon you wish to install. Select it to Install.
The advantage of this method is it can all be done through one device, in case the machine you run Kodi on doesn’t have a web browser or a dedicated tool to download zip files.
How to Install on a Device with No Web Interface?
If you are running Kodi on an embedded device, i.e. a device dedicated to do small or very specific tasks, such as only running Kodi with no Web browsers available – e.g. a Kodi box you bought on Amazon – there might be still a way to install Kodi addons aside from the default provided ones.
There’s a file transfer protocol which goes by the acronym FTP. To use it with ease you’ll need a smartphone (in this example I use Android based one), an FTP app (I use primitive FTPd which is free and open source) and a Wi-Fi network available. This is how you do so:
First, you’ll want to install the FTP app that will handle the FTP details for you. As mentioned, for Android devices I recommend using primitive FTPd which is available on Play Store, F-droid and even Amazon. I’m pretty sure there’s an app for iOS to, yet since I don’t own any such device I could not test and recommend one for you.
[iOS users may want to skip the next 2 paragraphs as they detail the setting of primitive FTPd which is probably not relevant to you]
primitive FTPd is very simple to use, it’s just a little confusing in the beginning, but don’t worry, I’m here to hold your hand. So launch primitive FTPd and push the cogwheel button, you’ll may want to play with these settings, but for this example we’ll use the default ones with as less modification as possible. In fact, just push the Password setting and enter the password of your choice (in this example I use the lazy 1234 just for demonstration). Note, you cannot skip this step, otherwise primitive FTPd will refuse to start the FTP server (see below). Oh, and you may want to adjust the folder you share through the FTP protocol, just scroll down a little until you reach Server Start Directory setting and adjust it to your likings.
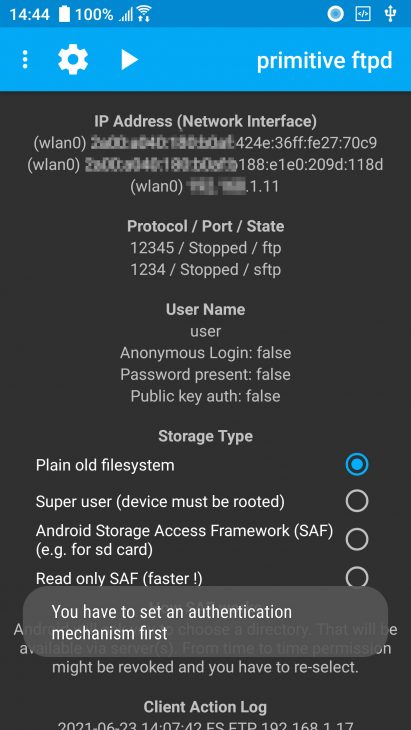
Once you’ve set a password, go back to the main screen, make sure you are connected to a (preferably, your) Wi-Fi network and push the play button right next to the cogwheel one. If successful, the play button will switch into a stop (square) button. Below there are all the details you’ll need.
Now, for the Kodi part. Turn on your Kodi box and navigate from the main screen into:
- Select the cogwheel button above the main menu
- Select File manager
- Select Add source (Note, if you’re mouse clicking it, you may need to double click)
- Select the top field where it says <None>
- Enter the details according to the following pattern:
ftp://USER-NAME:PASSWORD@ADDRESS:PORT
see the image below. All the details are available to you in the primitive FTPd main screen, the address is preceded by “(wlan0)”, use the short one, the ipv4 one, the ftp port is written below that (note, take the ftp not sftp – this is a little bit more complex), below that, the user name, which is by default “user” unless you changed it. After you’ve entered the pattern, select OK from the side menu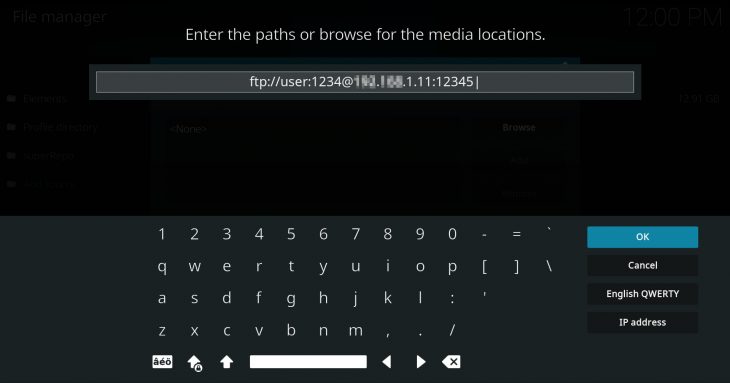
- Now, in the bottom field, choose a name that will be easy for you to recognize later on (I use myftp) and select OK below that

That’s it, the source is added, and as long as the ftp server on your smartphone is running and is in range, it should be available to you. If it didn’t work, Kodi will complain that there was a problem retrieving the directory.
So now, in order to install an addon, just download it to your smartphone’s download folder, go back to Kodi’s main screen and follow the first method of Install Directly from ZIP file mentioned above. Note, on step 5, when you navigate into the location where you saved the addon file, select the name you gave to the ftp source you have just established, on my example it was “myftp”.