420 clubhouseWizard
Description
420 ClubhouseWizard offers many maintenance features, selective add-on data saving, and automated build installs.
News
1.4.3 - Fix missing artwork on items (thanks @xulek)1.4.2 - A few bug fixes1.4.1 - Fix crash on fresh installs1.4.0 - Fix APK Installer - Convert official APK downloader to use official script - Add scrollbar to Save Data dialog - Fix skin path in build info1.3.7 - Fix import lock error1.3.6 - Fix notifications - Cleanup log files1.3.5 - Add Fen - Add Shadow - Fix restoring saved data every boot1.3.4 - Fix bad indent1.3.3 - Fix Unicode characters in notification window1.3.2 - Fix build restore1.3.1 - Fix "Keep Login Info" menu1.3.0 - Fix formatting of saved restore times - Fix local build zip being deleted on restore - Add YouTube API saving - Remove broken context menus - Fix repeating dialogs from shortcuts/favorites - Remove "Normal Install" option - Add "Logging Tools" menu - Add option to save guisettings.xml - Add TMDbHelper Fanart.tv saving - More fixes for OS X - Fix Seren Fanart.tv saving1.2.9 - Fix NuMb3r5 cache clearing - Fix hang during repo force check - Fix logins being restored every startup - Fix some file permission errors - Fix OS X backup errors1.2.8 - Add Gaia PM OAuth - Fix binary add-on restoration - Fix some issues with old settings - Fix timing on many startup tasks1.2.7 - Add TheMovieDb Helper1.2.6 - Fix Seren PM OAuth1.2.5 - Fix typo in debridit.py1.2.4 - Cover more edge cases during binary detection1.2.3 - Fix notification ID bug1.2.2 - Add Seren PM OAuth - Add AllDebrid spport for Gaia, Seren, ResolveURL, and URLResolver1.2.1 - General bug fixes1.2.0 - Silence save data notifications on startup - Fix Addon Installer menu - Convert addons.txt to JSON format1.1.1 - Fix error on advancedsettings categories1.1.0 - Add back advancedsettings area under System Tweaks/Fixes - Rudimentary version of advancedsettings editor. Can currently only handle editing pre-existing tags under 'cache' and 'network'. - Convert advanced.txt to JSON format - Add "built-in" advancedsettings.xml presets1.0.3 - Update artwork - Fix rare issues with URLs not working - Fix repetitive build prompt (again) - Fix builds downloading twice - Fix title coloring on notifications - Fix auto repo install - Fix first run settings not being respected1.0.2 - Fix crash in login menu - Fix auto install repo1.0.1 - Fix double startup - Fix repetitive build prompt - Fix main menu not opening on Krypton - Fix notification timeout - Fix crash in Trakt menu1.0.0 - Initial Commit
How To Install
Direct installation
Via Repository
Via Directory
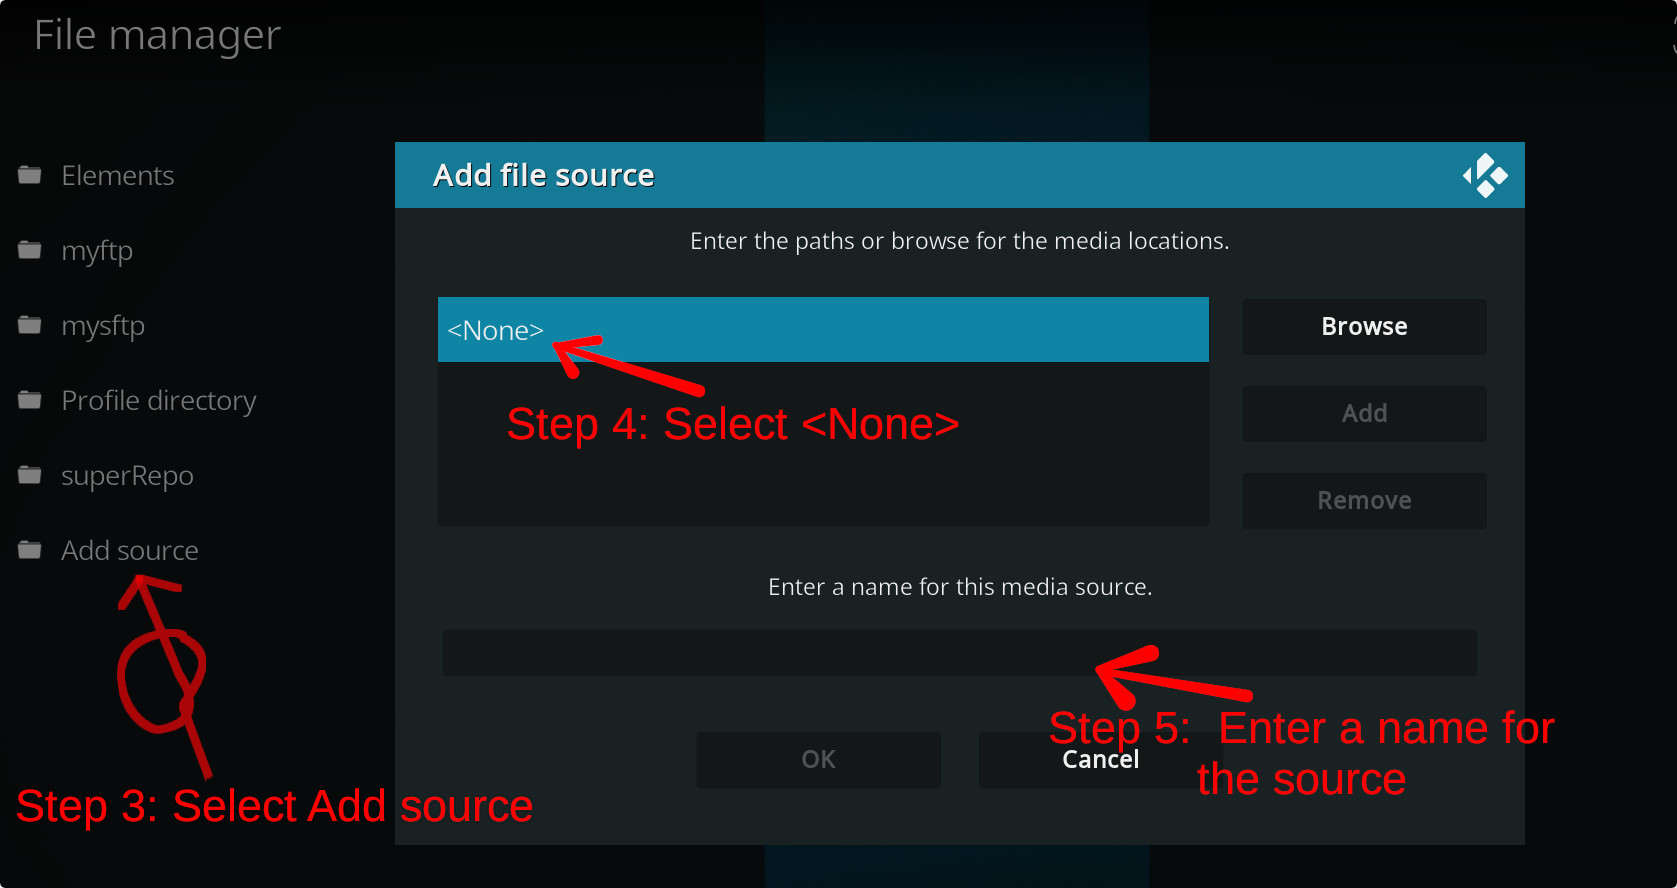
- First make sure you have the repository installed
- Open up Kodi and navigate into Add-ons.

- Click the open box icon (above the side-menu).
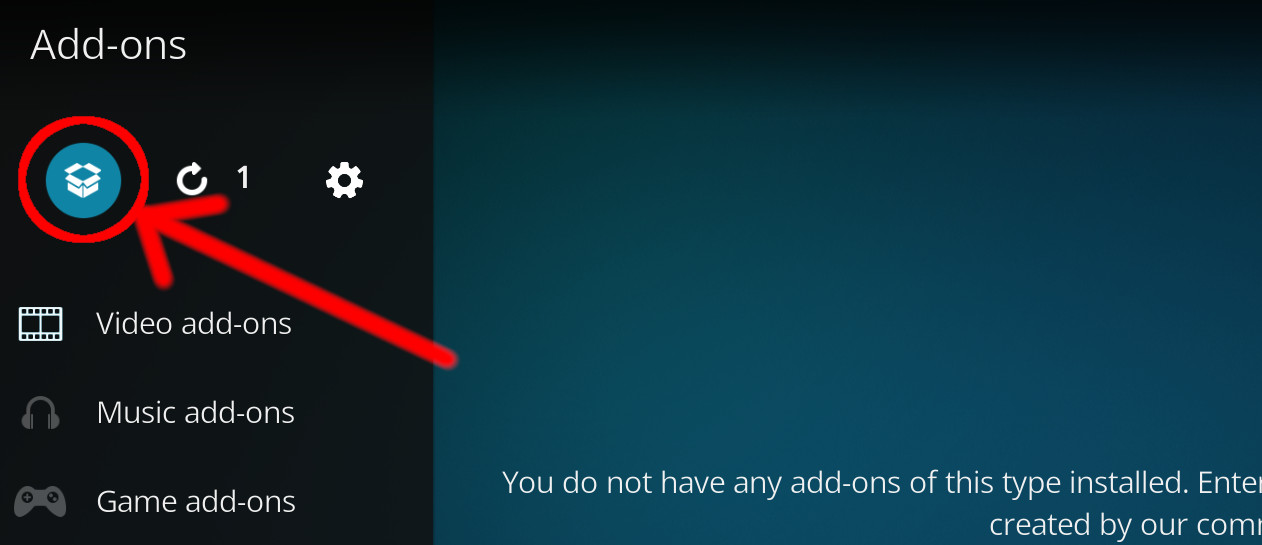
- Select Install from repository.
- If you have at least one repository (besides the default) installed:
Select the repository you wish to install from.
- If you have at least one repository (besides the default) installed:
- Select the category the addon belongs to, in this case it should be program.
- Select 420 ClubhouseWizard.
- Click Install.
For a full installation guide please click here.
Additional Information
| Updated: | May 26, 2021 |
In Repositories: |
|
| Platform: | all |
| License: | Not specified |
Depends On: |