One of the places where our important data may lie, is in our SMS / MMS messages, be it of sentimental or utilizable value, backing it up might prove quite useful.
However, unlike our photos, videos or song files which can be transferred and backed up with relative ease, backing our SMS / MMS usually proves to be a bit more complicated task that commonly require involving a third party-app or service.
Why Do It Manually?
Although there currently exist quite a bit of different apps that might take care of backing SMS and MMS for you, you may want to consider doing it manually for the following reasons:
- Apps may not work on different devices or different Android versions.
- Apps may backup your data by uploading it to the Internet cloud therefore requiring you to jeopardize the safety of your content.
- By backing up manually, you have complete control over where your data goes and what it goes through, thus limiting the risk of spyware in the process.
- Doing it manually can be overall less time consuming, easier and more straightforward than any other way.
How To Backup SMS / MMS Manually?
To backup your SMS / MMS messages manually you’ll need to have an Android tool called adb installed on your computer.
Now, the important thing to know regarding SMS / MMS is that Android stores them in a database file commonly named mmssms.db.
Moreover, deleted / archived messages are stored in a file named mmssms.db-journal which is located at the same location as mmssms.db – if you believe that these type of messages might be of use for you, you may also apply the same backup method as explained below.
Since the location of that database may differ between one device to another and also because other SMS apps can create databases of their own, such as, gommssms.db created by GO SMS app, the first thing you’d want to do is to search for these databases.
So, open up your CLI tool (I use Linux Terminal, you may use Windows CMD or PowerShell) and issue the following commands:
Note: below is a series of commands needed for the task and later is the explanation of what each command does.
Edit: as mentioned by a commenter, it’s necessary to enable USB debugging mode via “Developer options” settings of your device in order to issue the following commands successfully.
adb root

adb shell

find / -name "*mmssms*"

exit

adb pull /PATH/TO/mmssms.db /PATH/TO/DESTINATION/FOLDER
Explanation:
We start with adb root command in order to start adb in root mode – so that we’ll have permissions to reach system protected files as well.
“adb shell” is used to get inside the device shell.
Next, the “find” command is used to search for the databases. (in my case it’s found in: /data/data/com.android.providers.telephony/databases/mmssms.db)
* Tip: if your Terminal prints too many irrelevant results, try refining your “find” parameters (google it).
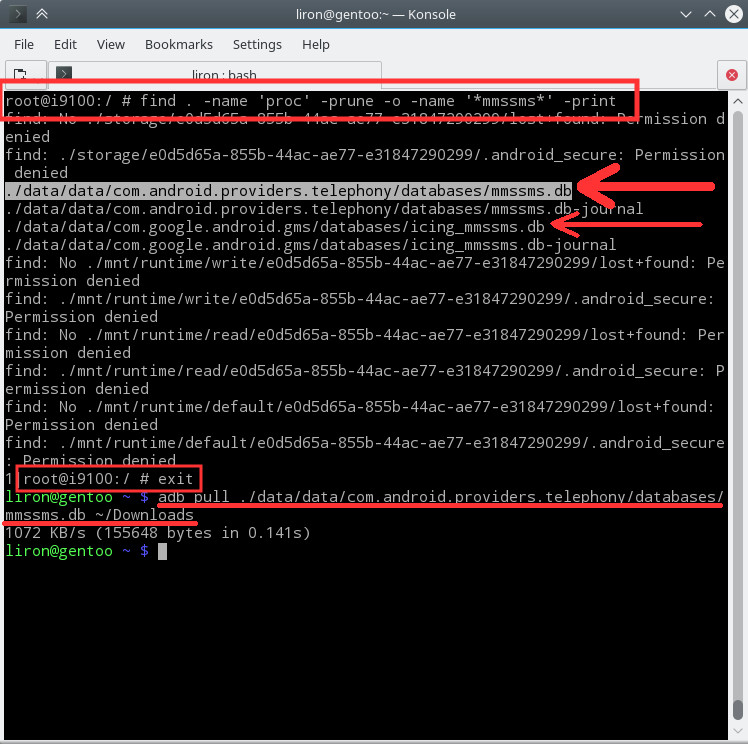
Android SMS&MMS databases
Then we use exit command in order to exit back to our local system directory.
Lastly, adb pull is used to copy the database files into a folder on our computer.
Now, once you’re ready to restore your SMS / MMS messages, whether it’s on a new device or a new system version, simply search again for the location of mmssms on the new system and replace it with the one you’ve backed.
Use adb push to replace it, e.g: adb push ~/Downloads/mmssms.db /data/data/com.android.providers.telephony/databases/mmssms.db
Note #1: you may need to restart your device afterwards in order for the SMS app to synchronize with the old / new database.
Note #2: the messages might take a couple of minutes until they show up in SMS app, be patient.


