Estuary uMod v3 skin (only for Ubuntu and scripts) by phil65, Ichabod Fletchman, darkozma.
Disclaimer
Estuary uMod v3 is a mod skin for Kodi. Only work on Ubuntu and require addicional scripts or it may cause issues.
Description
Estuary uMod v3 is a mod of the default skin for Kodi 20.0 (only for Ubuntu with scripts).
News
Skin Estuary uMod v3•4.0.3 K20 comp.•3.1.6 Widget Anime Removed.•3.1.4 Minor Change.•3.1.3 Add MC icon.•3.1.2 Minor bug fix.•3.1.1 Add more Halloween and Xmas logos.•3.1.0 Add support Halloween and Xmas logos.•3.0.7 Add requires.•3.0.6 Minor bug fix.•3.0.0 Skin uMod adapted to Kodi 18.•2.9.9 Add icon in sidemenu.•2.9.8 Change categories GT/NF.•2.9.0 Change categories PM and update Screenshot.•2.8.9 Update languages.•2.8.8 Change homescreen links.•2.8.6 Minor bug fix.•2.8.5 Variables modded.•2.8.2 Add new code and icon FibracatTV.•2.8.0 Update code.•2.7.9 Cleaning code.•2.7.8 Update resources.•2.7.6 Minor bug fix.•2.7.5 Home fix.•2.7.0 Platform fix.•2.5.0 Bug fix.•2.3.3 Minor fix.•2.2.8 Initial beta test.•2.2.5 Initial beta.•2.0.2 Home modded.•1.4.2 DialogButtonMenu modded.•0.2.1 Initial alpha.•0.0.1 Mod Estuary (0.8.5) for Ubuntu + Scripts.
How To Install
Direct installation
Via Repository
Via Directory
- First make sure you have the repository installed
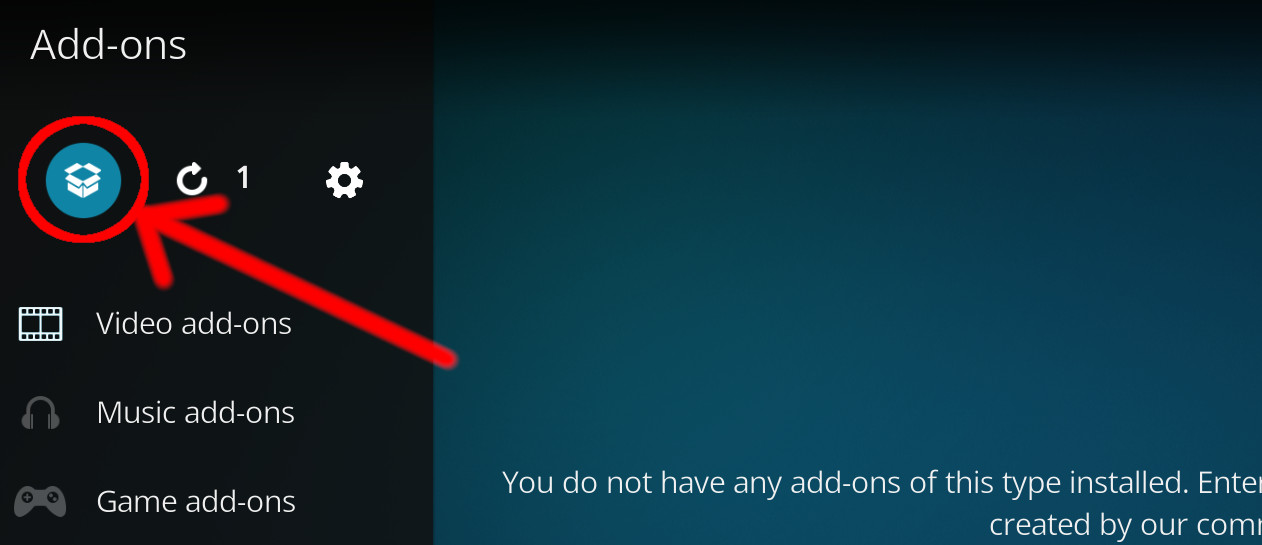
- Open up Kodi and navigate into Add-ons.

- Click the open box icon (above the side-menu).
- Select Install from repository.
- If you have at least one repository (besides the default) installed:
Select the repository you wish to install from.
- If you have at least one repository (besides the default) installed:
- Select the category the addon belongs to, in this case it should be skin.
- Select Estuary uMod v3.
- Click Install.
For a full installation guide please click here.
Additional Information
| Updated: | March 14, 2023 |
In Repositories: | |
| Platform: | linux |
| License: | CC BY-SA 4.0, GNU GENERAL PUBLIC LICENSE Version 2.0 |
Depends On: |