Kodi is an international media software used by people all over the world in order to, among other things, watch videos of all types and genres.
While Kodi itself comes with support for the different languages spoken throughout the world by default, the addons installed on Kodi, on the other hand, usually requires intervention from the user’s side in order to add local language support.
In the following I shall therefore describe how you can install subtitle services, to help you enhance your Kodi experience with your own homeland language.
Installing Subtitle Providers
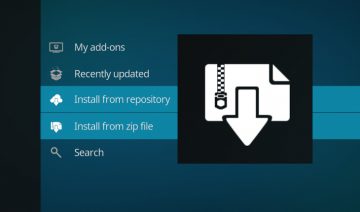
1. Open up Kodi and go into “Add-ons” (select it from the sidebar) -> click the opened box icon to the top left of the sidebar and select Install from repository.
Kodi’s opened box icon takes you to add-ons manipulation screen
2. Go inside Kodi Add-on repository (this repository contains official Kodi addons) -> Subtitles and skim through the list of addons to see if there’s any that appeals to your language.
For example, a general subtitles addon that includes subtitles for more than 75 different languages is OpenSubtitles.
3. Click on the subtitles provider you want to install then click Install and wait for it to download and install (you’ll see a popup notification and a check-mark next to the addon once it’s done).

OpenSubtitles addon is installed
* If for some reason the subtitles addon you chose to install doesn’t seem to download or install, you may also search for subtitles provider in 3rd party repositories such as: TVAddons and SuperRepo. The steps are the same as above, only, instead of going inside “Kodi add-on repository” you simply go inside the other repository you choose to install from.
Configuring Subtitles
1. In order to make use of the subtitles addon you’ve installed, first you’ll need to configure them, so go into Kodi’ settings by returning to the home-screen then click the “cogwheel” to the top of the menu sidebar.
2. Go inside Player settings, select Language from the menu and under “Subtitles” section, click on Preferred subtitle language and choose your language from the list.

Select your preferred language, also note the font and character set
– Next, still under “Subtitles” section, note the Font to use for text subtitles property – you may need to change it to a font that supports your language.
– Also, note the “– Character set” property, you may need to change it to your language as well.
3. After that, scroll down to the “Download Services” section, click on Languages to download subtitles for and select the languages you want to download subtitles for.

Most importantly, choose the languages you want to download subtitles for
Using Subtitles
Finally, to use the subtitles in practice, simply start playing the video you want to watch. From the player buttons click on the Subtitles button (next to the cogwheel button) -> Download and choose one of the available subtitles there.

Click Subtitles button to download subtitles