The guide before you consists of 2 parts:
- The first – a general explanation regarding the partitioning process and the tools needed.
- The second part – a live example of how it’s done on a real device (physical, as opposed to virtual) with genuine screenshots.
Note: as much as I’d like to, I do not currently possess the resources to grant readers technical support. The guide itself, in the vast majority of cases should be sufficient help. For any individual issue please refer to online forums which are meant for that purpose.
Why Re-Partition?
If you’re here out of curiosity or any other reason than necessity, you may wonder: “why would anyone want to repartition a smartphone / tablet?”.
To answer, each person probably has their own reason, a couple of such I can think of are:
- In the case of an upgrade, when there’s not enough space on one partition but others has aplenty.
- When you don’t have enough space to install more apps – since your data partition is full – so you want to resize that partition.
Of course, some cases can be resolved via a more simple solution, however, if you want to deal with the problem directly and not just bypassing it – repartition is perhaps the best way to go.
On the same note though, I must warn anybody who tries repartitioning his/her Android device.
Requirements
– ADB (Android Debug Bridge) installed – the reason we use ADB is it gives us a wider range of options in comparison to other software, such as Odin for instance, which only has limited set of features when it comes to repartitioning.
– Partitioning tool – you may already have one installed on your device by default (I’ll explain later where to look for it), but just in case you haven’t here’s one for ARM 32-bit:
Note, if you’re unsure about the architecture type of your device, you may try look for it online or use Android system info apps like this one.
– CLI (Command Line Interface) familiarity – the guide revolves around executing various commands in order to go through the partitioning process. There’s no GUI (Graphical User Interface) software that can achieve the same results at the moment.
– Backup (Optional) – I recommend you backup everything prior to making any changes.
Partitioning Steps
In order to re-partition your device, basically, these are the steps you’ll need to make:
1. Connect your device to your PC.
2. Open up a command shell, on Windows you’d probably use CMD / PowerShell, on Mac / Linux – Terminal.
2-a. Reboot into recovery mode. (Optional, depends on the partition you plan to modify)
3. Use ADB to connect to your device.
4. Launch a partitioning software.
5. Start partitioning.
6. Reinstall any required system file in case you’ve deleted those and afterwards you may exit the shell and reboot your device.
Explaining The Steps
1. We use another machine, in this case our PC, in order to re-partition Android, because we want to have access to our Android system just in case something goes wrong during the partitioning, and also, since Android system cannot be run and resized at the same time.
2. This step is rather self explanatory. We must use a flexible tool that will assist us re-partitioning.
2-a. If you wish to modify any partition other than the recovery partition, I recommend booting into recovery mode in order to do so.
Being inside recovery mode wouldn’t interfere with the process as you may delete the system partition and its files. Furthermore, it might become handy in case you’ll need to reinstall Android system.
3. ADB is an official Android developers tool and it also happens to be the most suitable tool for the job at the moment.
To make sure ADB recognizes your device, issue:
adb devices
If you’re device is recognized you’ll see output similar to this:

Check that ADB recognizes your device
To connect to your device you issue both:
adb root

adb shell
You should see a new command line host-name with a “#” sign next to it which indicates you’re connected as root user.
Note, you may need to navigate the command line shell into adb directory prior to issuing the commands.
4. In this step we launch the partitioning program we’re going to use by typing the name of the program and the right path to the block where our partitions lie (some devices may have more than one block).
Type fdisk /PATH/TO/DEVICE/BLOCK or parted /PATH/TO/DEVICE/BLOCK.

In case you get an output similar to the following in return: /sbin/sh: parted: not found then it means parted tool is probably not installed.
Look for partitioning tools inside /sbin directory (or /system/bin if it’s mounted), and use what you find in there.
If you don’t have any partitioning tool pre-installed on your device, you may use the one mentioned in the ‘Requirements’ section if your device is of similar architecture, otherwise, google for a suitable one online.
To install the partitioning tool on your device, first exit the device shell (type exit, press enter), then issue the following (extract the file in case it is compressed prior to doing so):
adb push /LOCATION/OF/PARTITIONING-TOOL /DESTINATION/OF/PARTITIONING-TOOL
This will install the partitioning tool on your device where it’ll remain until you reboot (upon reboot, Android automatically deletes unfamiliar files).
If Android complains you don’t have writing permissions to push the program into it, execute:
adb shell mount -o remount,rw /
This should remount the file system root directory with read & write permissions.
5. Step 5 may seem the shortest of all the above steps but it’s actually the longest and most important one.
Since this step depends on what you’re actually intending to do with your device – it doesn’t say much, it is an open step, open for your decisions that is.
By typing the help command of your partitioning tool you’ll get a list of the options available to you. For example, these are a few of the options you’ll see in parted:
- rm NUMBER – will delete a partition
- mkpart – will create a partition
- unit UNIT – will set unit type, for example “unit b” will set parted to use bytes, “unit gb” for Giga bytes, etc… (Tip: use bytes for maximum accuracy).
- name NUMBER NAME – lets you name the partition (upon making any changes, don’t forget to name the partitions properly).
- q – quit parted.
Important Things To Note:
- fdisk executes your commands only when changes are saved whereas Parted executes them instantly.
- fdisk may not fully support GPT partition table, thus in case yours is GPT, it’s recommended to use Parted instead.
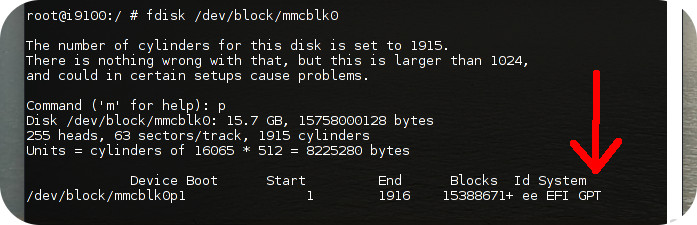
fdisk indicates a GPT table
- To set the file system type, in case Parted / fdisk couldn’t set the type you want, you may need to use another tool such as mke2fs.

6. When you’re done partitioning, reinstall required system files by using the recovery mode options available on the device, and only then exit the shell and reboot. Otherwise, you may not be able to boot at all. :(
Check out page #2 for a step by step example.